Wednesday, December 5, 2012

Install tomcat on ubuntu


Installing Tomcat on Ubuntu:
  1. Download Tomcat 7 tar.gz binary distribution from here.
  2. Unpack it using following command.
    1. tar xvzf apache-tomcat-7.0.29.tar.gz   
  3. Move it to a more appropriate location using following command
    1. sudo mv apache-tomcat-7.0.29/ /usr/share/tomcat7  
  4. Open up /usr/share/tomcat7/bin/catalina.sh file using following command
    1. gedit /usr/share/tomcat7/bin/catalina.sh   
  5. Add following two lines in there after the first line
    1. JAVA_HOME="/usr/lib/jvm/jdk-6u32"  
    2. JRE_HOME="/usr/lib/jvm/jdk-6u32/jre"  
  6. Open up /usr/share/tomcat7/conf/tomcat-users.xml and uncomment user and role entries there. Then add a manager-gui role and a user by adding following lines there
    1. <role rolename="manager-gui"/>  
    2. <user username="UserName" password="tomcat" roles="manager-gui"/>  
  7. Start the Tomcat server using following command
    1. sudo /usr/share/tomcat7/bin/catalina.sh run  
  8. Verify Tomcat installation using the following URL.
    1. http://127.0.0.1:8080/  
  9. To login as the manager, use the following URL, provide the relevant username and password.
    1. http://127.0.0.1:8080/manager/html

Thursday, November 1, 2012

install webmin on ubuntu 12.04 LTS


wget http://webmin.com/download/deb/webmin-current.deb

then type ls which will display the downloaded webmin(webmin-current.deb)

 dpkg -i webmin-current.deb

it will install (or) will list missing dependencies then type.

apt-get -f install

This command will fix(-f) the missing dependencies and install webmin

On successfull installation of webmin it will display

Webmin install complete. You can now login to https://ubuntu:10000/ as root with your root password, or as any user who can use sudo
to run commands as root.


open the link https://ubuntu:10000/

It will ask for username and password. Enter as root user.

Friday, October 5, 2012

HTML to PDF

Many projects require generating custom reports or information by converting the content from one format to other. The conversions may be to image, csv or pdf formats. The formats are converted for the ease of user. Certain file formats are best suited for different user specific requirements. For example, text/html is best format for emails, xml/json for web services, pdf or doc for saving the details for reference and taking printed hard copy. HTML and text documents are a non-issue for developers developing websites.
There are useful open source tools and libraries for generating images of various formats, csv(comma separated values), doc/docx and xls. Today, we are going to evaluate the options for PDF generation. Let’s have a look at some of the options available for generating PDF.
  1. FPDF: It is a simple class for generating PDF from pure PHP without using any extension like PDFlib library. And “F” in FPDF stands for “Free”. FPDF requires no special PHP extensions. Though, Zlib and GD extensions are to be enabled to support compression and GIF support respectively. It works with PHP 4 (at least 4.3.10) and PHP 5. The tutorials, download and demos are available at the project site http://www.fpdf.org/
  2. eZPDF: If you can’t control the PHP extensions, ezPDF is the class for you. It is another open source PDF generation class which generates PDF on the fly without requiring any special extensions at all. The performance is quite good but the features are slightly limited for complex outputs. Though, it is an excellent tool for generating simple PDF files. For details and documentation, you may refer the project site http://www.ros.co.nz/pdf/
  3. DOMPDF: It is a PHP5 (PHP 5.3 recommended) based PDF generation library and renders PDF primarily with PDFlib or with bundled and enhanced version of CezPDF class of R&OS. It is a feature rich library and supports almost all the HTML elements and styling attributes. Using with PDFlib, you will be required to download and enable PECL extension of PDFlib. The Mbstring is also required for the library to work. For further reading, refer to DOMPDF project home; the code is hosted at Google Code.
  4. FPDI: It is an extension built on FPDF. It is essentially a collection of PHP classes for reading existing PDF files and generates new PDF files from the existing files. The existing PDF files are used as templates to generate new files. It doesn’t require any additional library or PHP extension. The details are available at the FPDI Project Home.
  5. TCPDF: It is another extension built on FPDF. It extends the features provided by FPDF to provide even more options for generation of complex PDF structures. Other than almost complete HTML support, it also supports Javascript, digital signatures, barcodes and much more. For further reading, download, examples and documentation, please refer to the Project Homepage.
  6. PDFlib: For those who are keen on buying expensive licenses, PDFlib is the PDF generation library. Working on Open source technologies, I don’t prefer paid options. The details can be read at the project home.
  7. HTML2PDF: HTML2FPDF is a PHP Class library that uses the FPDF class library to convert HTML files to PDF files. HTML2PDF library is a collection of three classes namely PDF, HTML2FPDF and FPDF. The FPDF class of HTML2PDF is basically a modified version of original FPDF class. These classes are inherited classes with PDF class extending HTML2FPDF class, which in turn extends the FPDF class.

Wednesday, May 30, 2012

transfer files from one unix system to other unix


Just as all modern Unix-like systems have an SSH client, they also have SCP and SFTP clients. To copy a file from your computer to another computer with ssh, go to a command-line and type: 
 
scp <file> <username>@<IP address or hostname>:<Destination>


For example, to copy your TPS Reports to Joe's Desktop:


scp "TPS Reports.odw" joe@laptop:Desktop/
 

This will copy TPS Reports.odw to /home/joe/Desktop, because SCP uses your home folder as the destination unless the destination folder begins with a '/'.

To copy the pictures from your holiday to your website, you could do:
scp -r /media/disk/summer_pics/ mike@192.168.1.1:"/var/www/Summer 2008/"
 

The -r (recursive) option means to copy the whole folder and any sub-folders. You can also copy files the other way:
scp -r catbert@192.168.1.103:/home/catbert/evil_plans/ .
The '.' means to copy the file to the current directory. Alternatively, you could use secret_plans instead of '.', and the folder would be renamed.

Monday, April 9, 2012

mysql admin

http://www.techinterviews.com/29-mysql-interview-questions
http://www.interviewquestionsforu.com/MySQL.html
http://shumon.amitumioshay.com/index.php?option=com_content&view=article&id=235:mysql-interview-questions&catid=8:questions&Itemid=161

Friday, April 6, 2012

LINQ for beginners

http://www.youtube.com/watch?v=5OoUcDzWrV8&feature=related

Friday, March 30, 2012

Add Ldap user from php

$AD_server = "ldap://192.168.0.100";
$dn = "uid=netbeans1,ou=people,dc=example,dc=com";
$ds = ldap_connect($AD_server);
if ($ds) {
    ldap_set_option($ds, LDAP_OPT_PROTOCOL_VERSION, 3); // IMPORTANT
    $result = ldap_bind($ds, "cn=admin,dc=example,dc=com", "password"); //BIND
    $ldaprecord['objectclass'][0] = "inetOrgPerson";
    $ldaprecord['objectclass'][1] = "posixAccount";
    $ldaprecord['objectclass'][2] = "shadowAccount";
    $ldaprecord['cn'] = 'netbeans';
    $ldaprecord['givenName'] = 'netbeans';
    $ldaprecord['sn'] = 'netbeans';
    $ldaprecord['mail'] = 'emai@gmail.com';
    $ldaprecord['mobile'] = '+91 1234567890';
    $ldaprecord['uid'] = 'netbeans';
    $ldaprecord['displayName'] = 'netbeans';
    $ldaprecord['uidNumber'] = '1000';
    $ldaprecord['gidNumber'] = '10000';
    $ldaprecord['userPassword'] = 'netbeans';
    $ldaprecord['gecos'] = 'netbeans';
    $ldaprecord['loginShell'] = '/bin/bash';
    $ldaprecord['homeDirectory'] = '/home/john';
    $ldaprecord['shadowExpire'] = '-1';
    $ldaprecord['shadowFlag'] = '0';
    $ldaprecord['shadowWarning'] = '7';
    $ldaprecord['shadowMin'] = '8';
    $ldaprecord['shadowMax'] = '999999';
    $ldaprecord['shadowLastChange'] = '10877';
    $ldaprecord['postalCode'] = '31000';
    $ldaprecord['l'] = 'Toulouse';
    $ldaprecord['o'] = 'Example';
    $ldaprecord['homePhone'] = '+33 (0)40 35963258';
    $ldaprecord['title'] = 'System Administrator';
    $ldaprecord['postalAddress'] = '';
    $ldaprecord['initials'] = 'JD';
       

    $r = ldap_add($ds, $dn, $ldaprecord);
  
} else {
    echo "cannot connect to LDAP server at $AD_server.";
}

Wednesday, March 21, 2012

Scaffold your ASP.NET MVC 3

Among many other improvements with ASP.NET MVC 3, we’re keen to make it easier to pick up and start using productively if you’re entirely new to the framework, and to automate common development tasks if you’re experienced and already know what you’re doing.
So, I’ve been working with Scott Hanselman lately on an enhanced new scaffolding package called MvcScaffolding. The term “Scaffolding” is used by many software technologies to mean “quickly generating a basic outline of your software that you can then edit and customise”. The scaffolding package we’re creating for ASP.NET MVC is greatly beneficial in several scenarios:
  • If you’re learning ASP.NET MVC for the first time, because it gives you a fast way to get some useful, working code, that you can then edit and adapt according to your needs. It saves you from the trauma of looking at a blank page and having no idea where to start!
  • If you know ASP.NET MVC well and are now exploring some new add-on technology such as an object-relational mapper, a view engine, a testing library, etc., because the creator of that technology may have also created a scaffolding package for it.
  • If your work involves repeatedly creating similar classes or files of some sort, because you can create custom scaffolders that output test fixtures, deployment scripts, or whatever else you need. Everyone on your team can use your custom scaffolders, too.
Other features in MvcScaffolding include:
  • Support for C# and VB projects
  • Support for the Razor and ASPX view engines
  • Supports scaffolding into ASP.NET MVC areas and using custom view layouts/masters
  • You can easily customize the output by editing T4 templates
  • You can add entirely new scaffolders using custom PowerShell logic and custom T4 templates. These (and any custom parameters you’ve given them) automatically appear in the console tab-completion list.
  • You can get NuGet packages containing additional scaffolders for different technologies (e.g., there’s a proof-of-concept one for LINQ to SQL now) and mix and match them together
It’s currently at a beta level so it is expected to work :) but if you push it in funny ways you might get odd results. Please let me know if you discover issues – I’m sure there’ll be some – so we can tidy it up and make it more robust.

Installation

The short version is this: Install-Package MvcScaffolding. If you understood that, do it and skip ahead to “Scaffolding a CRUD interface”. If not, read on.
1. Install ASP.NET MVC 3, which includes the excellent NuGet Package Manager.
2. Create or open an ASP.NET MVC 3 web application. I’m calling mine ‘SoccerSite’.
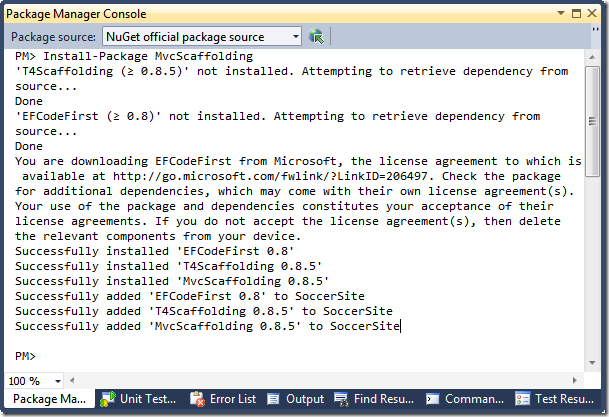
3. Install the MvcScaffolding package. You can install it using the NuGet Package Manager Console, so it only takes a few seconds and you don’t have to download anything using your browser.  To do so,
  • Open the Package Manager Console window using Visual Studio’s View->Other Windows->Package Manager Console menu item.
  • Enter the following:
Install-Package MvcScaffolding
image
  • That’s it! Note: be sure you installed MvcScaffolding, not MvcScaffold. We’ll retire the old MvcScaffold package shortly.
In case you’re wondering, EFCodeFirst is the new super-elegant version of Entity Framework that persists plain .NET objects to a relational database without any configuration fuss, T4Scaffolding is the core scaffolding infrastructure (locates types in your project, finds scaffolders in other packages, renders templates, etc), and MvcScaffolding is a set of ASP.NET MVC-specific templates (for controllers and views) that bolts onto the T4Scaffolding core.

Scaffolding a CRUD interface

Let’s create a model for a soccer team. Add the following class to your Models folder, then compile your solution (Ctrl-Shift-B):
namespace SoccerSite.Models
{
    public class Team
    {
        public int TeamId { get; set; }
        [Required] public string Name { get; set; }
        public string City { get; set; }
        public DateTime Founded { get; set; }
    }
}
Next, we can create a complete Create-Read-Update-Delete (CRUD) UI for this model by issuing a single scaffolding command into the Package Manager Console:
Scaffold Controller Team
Note: You can use the TAB key to autocomplete many things in the Package Manager Console. In this case, you can autocomplete the words “Scaffold” and “Controller”, since the scaffolding package knows about them. It doesn’t know about “Team”, though – we may add completion on model type names in a future version.
image
As you can see, it’s gone ahead and created a controller, a database context (a tiny bit of Entity Framework code that represents a data store), and views for all the CRUD actions. You can run it right now (Shift-F5), and as long as you have SQL Server Express running on your machine, EFCodeFirst will automatically connect to it, create your database schema, and you’ve got a basic working application without writing a single line of procedural code.
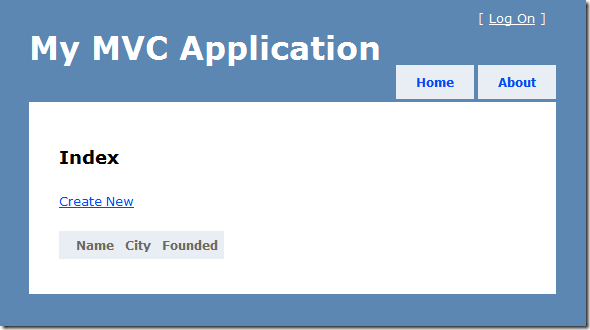
Note that since the model was called “Team”, the controller is called “TeamController”, so to reach it you need to point your browser to http://…/team:
image
The database is initially empty.
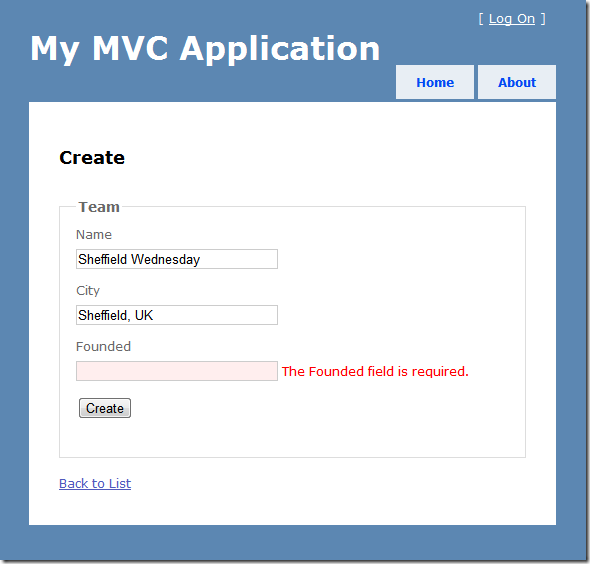
image
Creating an item. Validation rules are applied automatically. Note that since “Founded” is a DateTime it can’t be null and hence is required. Change it to DateTime? (i.e., with the question mark to make it nullable) if you want it to be optional.
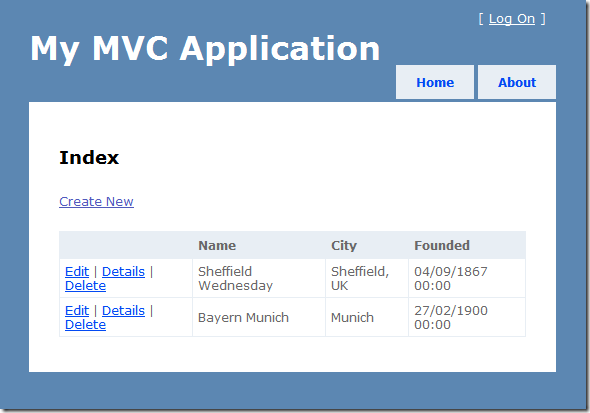
image
Listing items
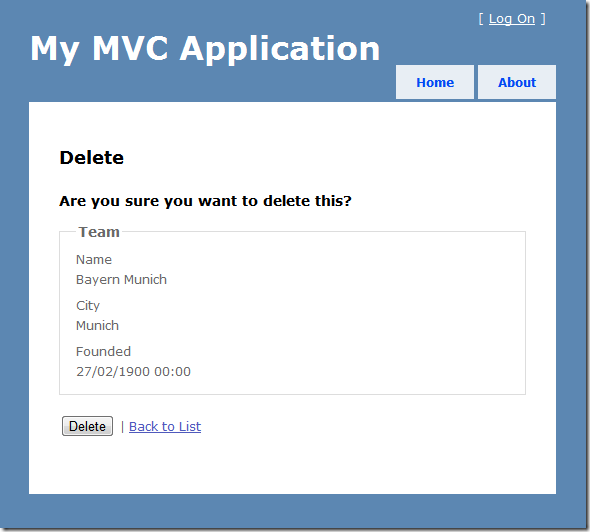
image
Deleting an item

But what if I don’t have SQL Express installed?

If you don’t have SQL Express installed and running, you may have got the following error when your code tried to read or write some data:
A network-related or instance-specific error occurred while establishing a connection to SQL Server. The server was not found or was not accessible. Blah blah blah…
No problem! You can quickly switch to use the new SQL Server Compact – a lightweight, in-process database – without having to download or install anything manually. Simply add SQL Server Compact to your project by issuing the following command in the Package Manager Console:
Install-Package EFCodeFirst.SqlServerCompact
Ta da – no more external database required. Run your project again (Shift-F5) and this time it will create and connect to a file-based database (a .sdf file will appear in your ~/App_Data folder). The EFCodeFirst.SqlServerCompact package adds a file to your project called AppStart_SQLCEEntityFramework.cs, which configures the runtime to use SQL CE.
Of course you probably still want the proper version of SQL Server when you eventually deploy your application for public use, but for small applications or for learning, SQL CE is really handy.

Scaffolding a repository

If you check out the code right now, you’ll see that TeamController reads and writes the data in SoccerSiteContext directly. That’s fine in many simple scenarios, but if you want to decouple your controller logic from persistence logic a little (e.g., so that you can write clean unit tests for the controller), you may prefer to reach your data through an interface.
No problem! Let’s regenerate the controller with the –Repository flag:
Scaffold Controller Team –Repository -Force
Notice that we also need to say –Force, otherwise the scaffolder won’t overwrite the files you already have in your project. Now the scaffolder will produce an additional class, TeamRepository, and the following interface which TeamRepository implements:
public interface ITeamRepository
    {
        void Add(Team post);
        void Delete(int id);
        IEnumerable<team> GetAllTeams();
        Team GetById(int id);
        void Save();
    }
TeamController will now only read and write data using ITeamRepository. If you’re new to ASP.NET MVC it may not be obvious why this is desirable, but if you start trying to write unit tests or switch data access technologies, you’ll find this interface-based data access method to be much cleaner and more flexible.

There’s so much more

It’s not just about CRUD! You can use scaffolding to create any type of project item if you write a template for it. This blog post has covered only the absolute beginning of what you can do, so over the coming days I’ll write blog posts to cover:
  • Scaffolding specific individual items (e.g., views, repositories, etc) rather than whole controllers and related files
  • Getting additional scaffolder packages and controlling which ones are used by default. For example, there’s currently a proof-of-concept LINQ to SQL scaffolding package that you can install and set to act as the default type of repository/data context.
  • Customising the T4 templates that the scaffolders use to generate code
  • Creating entirely new custom scaffolders for new types of things (e.g., unit test fixtures)

Monday, March 19, 2012

open ldap commands

apt-get install ldap-account-manager ldap-auth-config ldapscripts slapd ldap-utils migrationtools.

1) Create a file with ldif extension (userinfo.ldif)

dn: uid=user,ou=people,dc=example,dc=com
objectClass: inetOrgPerson
objectClass: posixAccount
objectClass: shadowAccount
uid: userid
sn: Doe
givenName: User
cn: User
displayName: John Doe
uidNumber: 1000
gidNumber: 10000
userPassword: user123
gecos: John Doe
loginShell: /bin/bash
homeDirectory: /home/john
shadowExpire: -1
shadowFlag: 0
shadowWarning: 7
shadowMin: 8
shadowMax: 999999
shadowLastChange: 10877
mail: rupesh123@example.com
postalCode: 31000
l: Toulouse
o: Example
mobile: +91 1234567890
homePhone: +33 (0)40 35963258
title: System Administrator
postalAddress:
initials: JD

2) Add User to openLDAP.

sudo ldapadd -x -D cn=admin,dc=example,dc=com -W -f userinfo.ldif

3) Search User:

ldapsearch -xLLL -b "dc=example,dc=com"
a) Displays the whole data of all the user in "dc=example,dc=com".

ldapsearch -xLLL -b "dc=example,dc=com" uid=user
b) Displays comple info of User whose uid=use.


ldapsearch -xLLL -b "dc=example,dc=com" uid
c) Displays the dn of all the users in "dc=example,dc=com"

 4) If you make a mistake when entering your information you can execute the dialog again using:
sudo dpkg-reconfigure ldap-auth-config 
 
The results of the dialog can be seen in /etc/ldap.conf 
 
5) Change User Password:
 
sudo apt-get install ldapscripts

Next, edit the config file /etc/ldapscripts/ldapscripts.conf uncommenting and changing the following to match your environment:

SERVER=localhost
BINDDN='cn=admin,dc=example,dc=com'
BINDPWDFILE="/etc/ldapscripts/ldapscripts.passwd" SUFFIX='dc=example,dc=com'
GSUFFIX='ou=Groups'
USUFFIX='ou=People'
MSUFFIX='ou=Computers'
GIDSTART=10000
UIDSTART=10000
MIDSTART=10000

Now, create the ldapscripts.passwd file to allow authenticated access to the directory:
sudo sh -c "echo -n 'secret' > /etc/ldapscripts/ldapscripts.passwd" sudo chmod 400 /etc/ldapscripts/ldapscripts.passwd


Replace secret with the actual password for your LDAP admin user.

The ldapscripts are now ready to help manage your directory. The following are some examples of how to use the scripts.
  • Change a user's password:
    sudo ldapsetpasswd userid
    Changing password for user uid=userid,ou=People,dc=example,dc=com
    New Password: 
    New Password (verify): 


https://help.ubuntu.com/11.04/serverguide/C/openldap-server.html

Saturday, March 17, 2012

configure xdebug netbeans ubuntu linux


Developers frequently need to trace the execution of their code, and debug it, and Drupal/PHP is no exception.
There are several PHP debugging frameworks/APIs available, including DBG, Gubed, Zend, and xdebug. Each of those supports different IDEs (Integrated Development Environments).
This article focuses on xdebug, and how you can set it up on your development machine or server.
xdebug provides the ability for more than one person to have debug sessions concurrently on the same server, using the DBGp protocol. Not all IDE's available support this feature however.
IDEs that use DBGp at present are:
  • Vim with the xdebug plugin (command line, non-GUI).
  • ActiveState Komodo (multi-platform)
  • Quanta Plus (KDE on Linux)

Installation

To install xdebug on a debian/Ubuntu system enter the following commands from sudo bash or root shell:
First, install PHP and MySQL if you already do not have them. You may not need the gd library if you do not have image manipulation modules.
aptitude install apache2 php5 php5-gd mysql-server php5-mysql
Next, install PHP development, Apache development, and PEAR.
aptitude install apache2-dev php5-dev php-pear make
Lastly, install xdebug using PHP's pecl
pecl install xdebug-beta 
This last step will run for a while, compiling xdebug from source. It should not have any errors.

Configuration

After the last command completes, you will have an xdebug.so library. You now need to configure apache to use it.
To do this, edit your PHP configuration file /etc/php5/apache2/php.ini and add in it the following section just before the [Date] heading:
zend_extension=/usr/lib/php5/20051025/xdebug.so

[debug]
; Remote settings
xdebug.remote_autostart=off
xdebug.remote_enable=on
xdebug.remote_handler=dbgp
xdebug.remote_mode=req
xdebug.remote_host=localhost
xdebug.remote_port=9000

; General
xdebug.auto_trace=off
xdebug.collect_includes=on
xdebug.collect_params=off
xdebug.collect_return=off
xdebug.default_enable=on
xdebug.extended_info=1
xdebug.manual_url=http://www.php.net
xdebug.show_local_vars=0
xdebug.show_mem_delta=0
xdebug.max_nesting_level=100
;xdebug.idekey=

; Trace options
xdebug.trace_format=0
xdebug.trace_output_dir=/tmp
xdebug.trace_options=0
xdebug.trace_output_name=crc32

; Profiling
xdebug.profiler_append=0
xdebug.profiler_enable=0
xdebug.profiler_enable_trigger=0
xdebug.profiler_output_dir=/tmp
xdebug.profiler_output_name=crc32
If you are using this on a server that is separate from the machine that you run the IDE in, then change the host name in xdebug.remote_host from localhost to the name of your server.

http://netbeans.org/kb/docs/php/configure-php-environment-ubuntu.html

Thursday, March 15, 2012

uninstall ubuntu 11 from windows xp

A.) Use Disk Manager in Windows to delete the Ubuntu partitions.
B.) Boot off your Windows XP CD.
  1. Choose “Repair”
  2. When it asks for the installation number, I put in “1″, and it worked fine (you may want to test this first to be sure.)
  3. Enter Admin password.
  4. At the command prompt type “fixmbr”, then confirm. Windows will overwrite the dual boot info in the MBR that Ubuntu put there.
  5. Reboot!

Wednesday, March 14, 2012

ubuntu root password

Where is root?

Ubuntu developers made a conscientious decision to disable the administrative root account by default in all Ubuntu installations. This does not mean that the root account has been deleted or that it may not be accessed. It merely has been given a password which matches no possible encrypted value, therefore may not log in directly by itself.
Instead, users are encouraged to make use of a tool by the name of sudo to carry out system administrative duties. Sudo allows an authorized user to temporarily elevate their privileges using their own password instead of having to know the password belonging to the root account. This simple yet effective methodology provides accountability for all user actions, and gives the administrator granular control over which actions a user can perform with said privileges.
  • If for some reason you wish to enable the root account, simply give it a password:

    sudo passwd root
     
    Sudo will prompt you for your password, and then ask you to supply a new password for root as shown below:

    [sudo] password for username: (enter your own password)
    Enter new UNIX password: (enter a new password for root)
    Retype new UNIX password: (repeat new password for root)
    passwd: password updated successfully 
     
    *** For Ubuntu 12.04 LTS need to execute one more command to enable root user:
            : sudo sh -c 'echo "greeter-show-manual-login=true" >> /etc/lightdm/lightdm.conf'.

          Now Reboot you system in Users List you will have Login option select that enter root click
          enter then it will ask for password enter password and hit enter. Now you logged as a root user
          (Note: At a times UserName will not display as root. Open terminal and look for the username there
          it will be showing as root).
     
     
  • To disable the root account, use the following passwd syntax:

    sudo passwd -l root 
     
  • You should read more on Sudo by checking out it's man page:

    man sudo
    
By default, the initial user created by the Ubuntu installer is a member of the group "admin" which is added to the file /etc/sudoers as an authorized sudo user. If you wish to give any other account full root access through sudo, simply add them to the admin group.

Adding and Deleting Users

The process for managing local users and groups is straight forward and differs very little from most other GNU/Linux operating systems. Ubuntu and other Debian based distributions, encourage the use of the "adduser" package for account management.
  • To add a user account, use the following syntax, and follow the prompts to give the account a password and identifiable characteristics such as a full name, phone number, etc.
    sudo adduser username
    
  • To delete a user account and its primary group, use the following syntax:
    sudo deluser username
    
    Deleting an account does not remove their respective home folder. It is up to you whether or not you wish to delete the folder manually or keep it according to your desired retention policies.
    Remember, any user added later on with the same UID/GID as the previous owner will now have access to this folder if you have not taken the necessary precautions.
    You may want to change these UID/GID values to something more appropriate, such as the root account, and perhaps even relocate the folder to avoid future conflicts:
    sudo chown -R root:root /home/username/
    sudo mkdir /home/archived_users/
    sudo mv /home/username /home/archived_users/
    
  • To temporarily lock or unlock a user account, use the following syntax, respectively:
    sudo passwd -l username
    sudo passwd -u username
    
  • To add or delete a personalized group, use the following syntax, respectively:
    sudo addgroup groupname
    sudo delgroup groupname
    
  • To add a user to a group, use the following syntax:
    sudo adduser username groupname
    

Sunday, March 11, 2012

asp.net mvc links

http://channel9.msdn.com/Events/TechDays/Techdays-2012-the-Netherlands/2364 (mvc4 features)
http://weblogs.asp.net/scottgu/archive/2010/07/02/introducing-razor.aspx (about razor)
http://www.asp.net/mvc/tutorials/mvc-music-store (sample)
http://weblogs.asp.net/imranbaloch/archive/2011/01/16/asp-net-mvc-3-new-features.aspx (features)
http://www.youtube.com/watch?v=wfuoLiwsLfw&feature=player_embedded (Nuget excellent Video,Package Manager Intro) .
http://weblogs.asp.net/scottgu/archive/2011/01/13/announcing-release-of-asp-net-mvc-3-iis-express-sql-ce-4-web-farm-framework-orchard-webmatrix.aspx (aspnet mvc3 features SCOTTGU blog)

Thursday, February 23, 2012

Coding Standards

Why have code conventions?

Code conventions are important to programmers for a number of reasons:
  • 80% of the lifetime cost of a piece of software goes to maintenance.
  • Hardly any software is maintained for its whole life by the original author.
  • Code conventions improve the readability of the software, allowing engineers to understand new code more quickly and thoroughly.
It doesn't matter what your guidelines are, so long as everyone understands and sticks to them. These PHP coding guidelines are based largely on Sun's Code Conventions for the Java Programming Language. Deviations from the Sun code conventions are largely a result of the interaction of PHP with other web server applications, primarily databases.

Enforcing the code conventions

If you are the lead developer on a project, you will encounter programmers who do not like your guidelines and refuse to abide by them. Coping with this is one of the small obstacles that leading a development inevitably entails. You have two options. You might decide that the value of the errant programmer's contributions outweighs the inconsistency introduced by their refusal to abide by your coding conventions. However, you are not doing yourself or your team any favors by permitting one programmer to be "above the rules". This will only lead to disruptions in the team down the road. The best way to address this issue is two-fold. First, try to achieve consensus among the team members. Not everyone will agree on everything, but it's better to minimize disagreements when possible. Second, once a code convention has been established, do not accept code into the project unless it adheres to those guidelines. This will cause some initial friction, but the long term cost of inconsistent coding conventions is much greater than the small amount of effort it will new team members to adapt to those conventions. At the end of the day, professional programmers know that they need to be adaptable and to abide by the rules of the current project.

Indentation (tabs vs. spaces)

  • Do not use spaces to indent: use tabs.
  • Indent as much as needed, but no more. There are no arbitrary rules as to the maximum indenting level. If the indenting level is more than 4 or 5 levels you may need to think about factoring out code.

Justification

  • A tab is a single character. While file size may not be the issue it once was, it is still wasteful to use four (or eight!) characters when a single character will do. When most lines in a script are indented at least once, this waste can quickly add up and become significant.
  • Most editors can set how many "spaces" are displayed for each tab, so you can set your editor up to display tabs however you like (2 spaces, 4 spaces, whatever), and the other programmers on the team may do the same.
  • If you need to convert a script to use spaces for indentation, it is a simple matter to replace each of the tabs with four spaces, or six spaces, or whatever is needed (the Pear project, for example, demands four spaces for each level of indentation).
  • As much as people would like to limit the maximum indentation levels, it never seems to work in general. We'll trust that programmers will choose wisely how deeply to nest code.

Example

function func()
{
 if (something bad)
 {
  if (another thing bad)
  {
   while (more input)
   {
    ...
   }
  }
 }
}
 

Line endings: 

The three major operating systems (Unix, Windows, and Mac OS) use different ways to represent the end of a line. Unix systems use the newline character (\n), Mac systems use a carriage return (\r), and Windows systems are terribly wasteful in that they use a carriage return followed by a line feed (\r\n). Ensure that your editor is saving files in the UNIX format. This means lines are terminated with a linefeed (\n), not with a carriage return/linefeed (\r\n) as they are on Win32, or a carriage return (\r) as they are on the Mac. Any decent editor (such as Notepad++) is able to do this, but it might not be the default. If you develop on Windows (and many people do), either set up your editor to save files in Unix format or run a utility that converts between the two file formats.

Make names fit

Names are the heart of programming. In the past people believed knowing someone's true name gave them magical power over that person. If you can think up the true name for something, you give yourself and the people coming after power over the code.
A name is the result of a long deep thought process about the ecology it lives in. Only a programmer who understands the system as a whole can create a name that "fits" with the system. If the name is appropriate everything fits together naturally, relationships are clear, meaning is derivable, and reasoning from common human expectations works as expected.
If you find all your names could be Thing and DoIt then you should probably revisit your design.

Hungarian notation

Hungarian notation is the practice of embedding metadata about a variable into the variable's name. For example, a variable holding a long integer might be prepended with "l" (lower case L), while an unsigned 32-bit integer might be prepended with "u32". There are several problems with using this type of notation. First, PHP is an untyped language, so "type" is not relevant. Second, Hungarian notation can quickly render a variable name into an unrecognizable mess (Wikipedia uses "a_crszkvc30LastNameCol" as an example: a constant reference argument, holding the contents of a database column LastName of type varchar(30) which is part of the table's primary key).
Having variables which are not human-readable will lead to errors when the code is revised or maintained. Do not use Hungarian notation.

Justification

  • Hungarian notation is directly counter to encapsulation, one of the basic principles of good programming.
  • Hungarian notation is essentially a method of encoding comments into a variable name. There are two reasons this is a bad idea. First, it is redundant: the proper place to comment on the type and usage of a variable in when the variable is declared. Second, it leads to having incorrect information embedded in the application. What happens when the requirements change, and $i_postal_code must support not only US zip codes (which are numbers), but also Canadian postal codes (which have letters)? Now $i_postal_code is a string. Will the programmer go through every file and change the name of this variable everywhere it appears? When deadlines are looming, tasks like this are postponed... and deadlines are always looming.
  • Hungarian notation is the Weapon Of Mass Destruction ™ of obfuscation techniques, and code obfuscation is both counterproductive and immoral.

Class names:

Class names should be nouns, in mixed case with the first ketter of each internal word capitalized. Try to keep your class names simple and descriptive.
  • Use upper case letters as word separators, lower case for the rest of a word
  • First character in a name is upper case
  • No underscores ('_').
  • Name the class after what it is. If you can't think of what it is, that is a clue you have not thought through the design well enough.
  • Compound names of over three words are a clue your design may be confusing various entities in your system. Revisit your design. Try a CRC card session to see if your objects have more responsibilities than they should.
  • Avoid the temptation of bringing the name of the class a class derives from into the derived class's name. A class should stand on its own. It doesn't matter what it derives from.
  • Suffixes are sometimes helpful. For example, if your system uses agents then naming something DownloadAgent conveys real information.

Example

class NameOneTwo
class Name

Class library names

Now that name spaces are becoming more widely implemented, name spaces should be used to prevent class name conflicts among libraries from different vendors and groups. When not using name spaces, it's common to prevent class name clashes by prefixing class names with a unique string. Two characters is often sufficient, but a longer length is fine. For example, the xTS project used "Xts" (don't let the shift in capitalization bother you: see Class names).

Example

Jo Johanssen's data structure library could use JJ as a prefix, so classes could be:
class JjNameOneTwo
{
} 
 

Method and function names

Methods should be verbs, in mixed case with the first letter lowercase, with the first letter of each internal word capitalized. Most methods and functions performs actions, so the name should make clear what it does, as consisely as possible: checkForErrors() instead of errorCheck(), dumpDataToFile() instead of dumpDataFileToDiskAfterAParticularlyHorrendousCrash(). This will also make functions and data objects more distinguishable.
  • Suffixes are sometimes useful:
    • Max - to mean the maximum value something can have.
    • Cnt - the current count of a running count variable.
    • Key - key value.
    For example: RetryMax to mean the maximum number of retries, RetryCnt to mean the current retry count.
  • Prefixes are sometimes useful:
    • Is - to ask a question about something. Whenever someone sees Is they will know it's a question.
    • Get - get a value.
    • Set - set a value.
    For example: IsHitRetryLimit.

Example

class JjNameOneTwo
{
 function setSomething()
 {
  ...
 }
 function handleError()
 {
  ...
 }
}

Variable names

Variable names should be all lowercase, with words separated by underscores. For example, $current_user is correct, but $currentuser, $currentUser and $CurrentUser are not. Variable names should be short yet meaningful. The choice of a variable name should indicate to the casual observer the intent of its use. One-character variable names should be avoided except for temporary variables and loop indices. Common names for temporary variables are i, j, k, m, and n for integers; c, d, e for strings.
  • use all lower case letters
  • use '_' as the word separator
  • do not use 'l' (lowercase 'L') as a temporary variable
  • do not use '-' as the word separator

Justification

  • This allows a variable name to have the same name as a database column name, which is a very common practice in PHP.
  • 'l' (lowercase 'L') is easily confused with 1 (the number 'one')
  • if '-' is used as a word separator, it will generate warnings used with magic quotes.

Example

function HandleError($error_number)
{
 $error = new OsError;
 $time_of_error = $error->getTimeOfError();
 $error_processor = $error->getErrorProcessor($error_number);
}

Example

$myarr['foo_bar'] = 'Hello';
print "$myarr[foo_bar] world"; // will output: Hello world
$myarr['foo-bar'] = 'Hello';
print "$myarr[foo-bar] world"; // warning message

Method argument names

Since function arguments are just variables used in a specific context, they should follow the same guidelines as variable names. It should be possible to tell the purpose of a method just by looking at the first line, e.g. getUserData($username). By examination, you can make a good guess that this function gets the user data of a user with the username passed in the $username argument. Method arguments should be separated by spaces, both when the function is defined and when it is called. However, there should not be any spaces between the arguments and the opening/closing parentheses.

Example

class NameOneTwo
{
 function startYourEngines(&$some_engine, &$another_engine)
 {
  $this->some_engine = $some_engine;
  $this->another_engine = $another_engine;
 }
 var $some_engine;
 var $another_engine;
}

Example

get_user_data( $username, $password ); // NOT correct: spaces next to parentheses
get_user_data($username,$password); // NOT correct: no spaces between arguments
get_user_data($a, $b); // ambiguous: what do variables $a and $b hold?
get_user_data($username, $password); // correct

Array elements

Since array elements are just variables used in a specific context, they should follow the same guidelines as variable names.
  • Access an array's elements with single or double quotes.
  • Don't use quotes within magic quotes

Justification

  • Some PHP configurations will output warnings if arrays are used without quotes except when used within magic quotes

Example

$myarr['foo_bar'] = 'Hello';
$element_name = 'foo_bar';
print "$myarr[foo_bar] world"; // will output: Hello world
print "$myarr[$element_name] world"; // will output: Hello world
print "$myarr['$element_name'] world"; // parse error
print "$myarr["$element_name"] world"; // parse error

Constant (define) names

Constants should be all uppercase with words separated by underscores ('_').
  • use all lower case letters
  • use '_' as the word separator

Justification

It's tradition for global constants to named this way. You must be careful to not conflict with other predefined globals.
This capitalization method for constant values (particularly for language-specific constants) provides the greatest amount of flexibility.

Example

define("A_CONSTANT", "Hello world!");

Contant values

  • Text fragments should have the first letter capitalized, with the rest in lower case. This allows capitalization of text fragments to be handled with a style, based on how that sentence fragment is used. See also: http://www.w3.org/TR/REC-CSS2/text.html#propdef-text-transform, http://www.devguru.com/Technologies/css/quickref/css_texttransform.html.
  • Complete sentences should be punctuated as sentences. This means using capitalizing the first word and including the end punctuation. Note: a text fragment with a colon at the end is not a complete sentence.
  • Text fragments should not have punctuation at the end unless it is a question, in which case the use of a question mark is acceptable (because this actually makes the text fragment a complete sentence with an implied subject/predicate/whatever).
  • It is very easy to overuse colons and exclamation points, and having them as part of the constant limits that constant's reusability, so these should not be included unless it is absolutely necessary. It rarely is.

Example

define("TITLE_CONSTANT", "User profile administration");
define("ERROR_CONSTANT", "This is an error message.")
 
Vtiger Coding Guidelines: 
http://wiki.vtiger.com/index.php/CodingGuidelines


Monday, January 16, 2012

Best Practices for Speeding Up Your Web Site

http://developer.yahoo.com/performance/rules.html

Friday, January 13, 2012

mvc vs web forms asp.net

Software Architects have been involving lot of debates about different approaches and architectures. Some of the examples are ORM Vs Store Procedures, REST Vs SOAP, etc. There is a debate happening inside the Microsoft community about ASP.net web form Vs ASP.net MVC. Many people thinking that ASP.net MVC will be replace webforms at least eventually and others are thinking that ASP.net MVC will not be replace webforms. Will ASP.net MVC replace webforms?. ASP.net MVC is an alternative approach to webforms rather than a replacement. It will not replace webforms and webforms will not replace ASP.NET MVC. The fact is that ASP.NET MVC and webforms will co-exist and that ASP.NET MVC is not a replacement for webforms. If you prefer ASP.net MVC use it and you feel webform is more comfortable, you can use it. . Both approaches are just choices and different approaches and choices are good things. Different choices are available for other platforms especially in the Java platform. 

Problems with ASP.net Web Form
What are the problems with webforms? In webforms, Microsoft has tried to make windows form model development for web application development. That model was attracted lot of windows form developers especially VB 6.0 developers. Many of VB 6.0 developers had moved to ASP.net web development without knowing the basics of HTTP and web. For simulating windows form model development experience, webforms introduced event-driven approach and also introduced Viewstate and Postback. The end result is that web forms breaks the stateless nature of the Web. Both Viewstate and Postbacks have been made lot of problems and increased complexity of the web application development. Many web pages having hundreds of KB size of Viewstate that affected the performance of the applications sometime. Developers do not have the control of the rendering HTML of web forms and Server controls that render html with mixed inline style and deprecated tags that does not follows standards. Another problem with Web Forms is the integration of JavaScript frameworks due to the naming conventions of rendered HTML. The page life cycle of the Web Form is too complex and has the tightly coupling between all things in the ASP.net framework and a single class is used both to display output and handles user input. So unit testing is almost an impossible task. Today unit testing is very important in modern software development especially when we following agile methodologies and practices. Since web is a stateless thing, Events, Postbacks and Viewstate are not a good way. Today many ASP.net web form developers are facing different type pf browser compatibility issues when developing public face internet applications

The ASP.net MVC way
The ASP.NET MVC simplifies the complex parts of ASP.net Web Forms without any compromise of the power and flexibility of ASP.NET platform. ASP.net MVC implements Model-View-Controller UI pattern for web application development that lets you allows to develop applications in a loosely couples manner. MVC pattern is separating the application in three parts- Model, View and Controller. A view is responsible for rendering the user interface (UI) of the application and it is nothing more than html templates that filled with application’s data passed by the controller. The Model implements the logic for the application's data and it represents the business objects of the application that using the View for rendering user interface. Controllers are handles and responds to user input and interaction. The web request will be handled by the controller, and the controller will decide which model objects to use and which view objects to render. The MVC model replaces the Web Form events with the controller actions. The main advantages of the MVC models are clear separation of concerns, unit testing facility, and more control over the URLs and HTML. The MVC model does not use Viewstate, Postbacks, Server controls, and server-based forms that enable full control over the application and html rendered by the Views. MVC model is using Representational state transfer (REST) based URLs instead of file-name extensions used by the Web Form model so that we can make search engine optimization (SEO) URLs published by the application.

Advantages of MVC Model
  1. Enable clean separation of concerns (SoC) .
  2. Enable full control over the rendered HTML.
  3. Enable Test Driven Development (TDD) (built with TDD in mind).
  4. SEO and REST friendly URL.
  5. Easy integration with JavaScript frameworks.
  6. Support third-party view engines such as NVelocity, Brail, NHaml.
  7. No ViewState and PostBack events.
  8. Follows the stateless nature of web.
  9. Extensible and Pluggable framework. 
  10. Ideal platform for Web 2.0 applications.
Advantages of Web Form Model
  1. Provides RAD development.
  2. Easy development model for heavy data-driven LOB applications.
  3. Provides rich controls.
  4. Familiar model for windows form developers.
Which is the best approach?
The choice would be vary on different people. If you want more control over the HTML or you want Test Driven Development (TDD), or you care about web standards, accessibility, or you want to build SEO based URLs, you can choose MVC model. If you want rich controls and state oriented event-driven web development, you can choose Web Forms model. If you feel more comfortable with MVC, choose that model and you feel Web Form model is more comfortable, choose that model. Both are just choices. If you start your career with ASP.net Web Forms and do not have full knowledge of Web, it will be very difficult moving to MVC model.
I prefer MVC over Web Forms and I feel that Microsoft is going to a right direction through MVC. Its technical features as well as the open source nature are attracted me a lot.The MVC model allows me full control over the HTML and enables Test Driven Development (TDD). We can easily integrate with jQuery and other JavaScript frameworks with MVC. Using extension methods of C# 3.0, we can make powerful and rich HTML helper methods. I believe that tesatbility, refactoring capability and maintainability are the main factors for a successful project and prefer these factors than RAD capability. The MVC model allows to build highly testable, maintainable loosely coupled applications with good practices such as TDD, Seperation of Concerns (SoC) and Dependency Injection (DI). You MUST use ASP.NET MVC for public face internet applications.

Tuesday, January 10, 2012

Digital Certificates

http://jsignpdf.sourceforge.net/en_US/faq.html
http://docs.oracle.com/javaee/6/tutorial/doc/bnbxw.html
http://docs.oracle.com/javaee/1.4/tutorial/doc/Security6.html
http://docs.oracle.com/javase/6/docs/technotes/tools/solaris/keytool.html
http://www.sslshopper.com/article-most-common-java-keytool-keystore-commands.html


Friday, January 6, 2012

Truncate vs Delete

TRUNCATE:-
1) TRUNCATE is faster and uses fewer system and transaction log resources than DELETE.
2) TRUNCATE removes the date by deallocating the data pages used to store the table's data, and only the  page deallocations are recorded in the transaction log.
 3) TRUNCATE removes all the rows from a table, but the table structure, its columns, constraints, indexes, and permissions remain. You cannot use TRUNCATE TABLE on table referenced by a FOREIGN KEY constraint. As TRUNCATE cannot be rolled back unless it is used in a TRANSACTION
4)TRUNCATE is a DDL Command.
5)TRUNCATE resets the identity field of the table.

DELETE:
1) DELETE removes one record at a time, if used with a predicate in a where clause and records an entry in the transaction log for each deleted row.
2)If you want to retain the identity counter, use DELETE instead. If you want to remove table definition and its data, use the DROP TABLE statement.
3)DELETE can be used with or without a WHERE clause.
4)DELETE activate triggers.
5)DELETE can be rolled back.
6)DELETE is a DML Command.
7)DELETE does not reset the identity of the table.